In order to add my teaser trailer I needed to put my trailer on youtube so that I could embed the link and copy it into HTML and then compose it to put it on my blog. Also by putting my teaser trailer on youtube helps promote the film.
Using a blog to show my research and planning has loads of advantages - not only is it easy to organise and manage tasks easily, but it is more enjoyable for the viewers to read and it is easier to support my research of examples of images, video clips, sound files and links.
To Film My Teaser Trailer I used a digital camera (Panasonic HDC TM900) - it was easy to film this way with this camera as I could take numerous shots which could be erased if I was not happy with them.
In order to edit my teaser trailer I needed to use the software called 'Avid'. Using this I was able to separate all my shots into 'bins', onto the screen and also dragging them as I needed them on screen.
To create my taglines and billing, I used Adobe's photoshop - this allowed me to change colour, move around any images and word that I needed to be put in certain places to look authentic and real, I was able to crop images and sentences in order to make it the size or shape I wished it to be.
I used tools I used:
'Magnetic Lasso'
This enabled me to crop round an image easily, which was extremely useful when making my poster and magazine front cover.
The 'Eye Dropper Tool'
This enabled me to make colours from different things the same from one spot to another - and the ability to fill spaces with different colours.
'Hand Tool'
This tool was probably one of the most crucial tools that I used most as this enabled me to move things around so I could make the presentation correct and most importantly make my poster and magazine front cover look real.
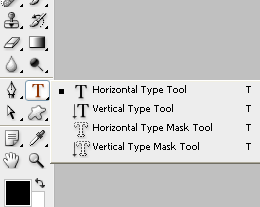
'Typing tool'
This tool enabled me to write things on my poster, magazine and even teaser trailers with the billing, taglines.
Once these images were made and saved, I then dragged them into Avid and used special effects that appear on screen with sound effects - these were taken from the BBC Sound Effects Library.
This is part of the Tool bar on Adobe's Photoshop
Another thing that I used photoshop for in my teaser trailer was at the end of the trailer when the name 'The Conspiracy' comes up. I made each letter come up separately, like a typewriter, which gave the film a conspiracy look. In able to achieve this I needed to use Photoshop. I used each letter and saved each letter I added which I then put sound effects off a computer read out.
Using the bins made my editing much easier and it was really beneficial to recognise the right shot because I organised them in to scenes. Each shot was carefully labeled into sections regrading each scene - making the process run much smoother making fewer mistakes and spending lots of time looking for each shot and because I had lots of shots that gave me a bigger option. I took the shots which matched my storyboard and running order. My Storyboard really helped me when taking my shots because I new what shot I needed to do. Therefore all the research and planning I did helped me shoot each shot much faster. The multi track feature allowed me to layer all my shots with their effects and music - then carefully editing them together.
Here are some of my screenshots of certain elements of the Avid editing software, the first being a bin of my shots, second being my layering, tracks and my bin selection.
When I edited my trailer there were two square at the top, the one on the left was the shot I was including and the one on the right was the actual trailer and what I had so far.
This image is what Avid looks like when all of my bins are selected, you can see all the elements of editing software.


No comments:
Post a Comment